Es wäre interessant zu sehen, wie hoch die erwartete Ausgabe auf Papier sein muss.
Was „Print Screen“ für Sie tun muss bzw. warum es besser geeignet wäre...

Ihr rotes Rechteck ist 21,0 x 29,7
Meter groß und im Porträtstil gehalten.
Ihre Model_Space-Ansicht auf dem Bildschirm ähnelt höchstwahrscheinlich eher einer Landschaft ...
... Sofern Ihr Monitor natürlich nicht vertikal positioniert ist. (meiner ist es nicht)

Wenn Sie das rote Rechteck und „Ansicht auf Selektion“ (
ZS) auswählen,
zoomt QCAD automatisch und lässt oben und unten einen bestimmten Rand frei.
Siehe: App.Prefs. .. Grafikansicht .. Erscheinung .. Auto Ansicht .. Randabstand (px) (Standard ist 25 Pixel)
Links und rechts wird es viel mehr Platz geben.
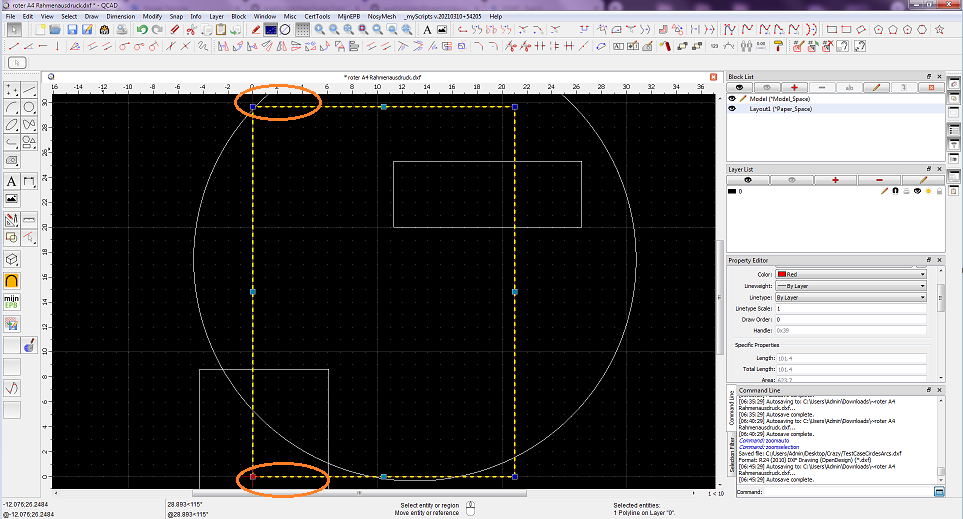
- Fenster drucken 1.png (145.36 KiB) Viewed 82424 times
Ihr Papier ist im Hochformat als ISO A4 konfiguriert.
Wenn ich dann „Aktuelle Ansicht drucken“ (
Strg+Alt+P) verwende, ermittelt QCAD einen Maßstab (z. B. 0,00356) und
eine untere linke Ecke (z. B. -18,9118; -26,7466), sodass die Breite der Model_Space-Ansicht unter Berücksichtigung der Papierränder (Hellblau) auf die Breite einer Seite passt und die Ansicht zentriert ist.
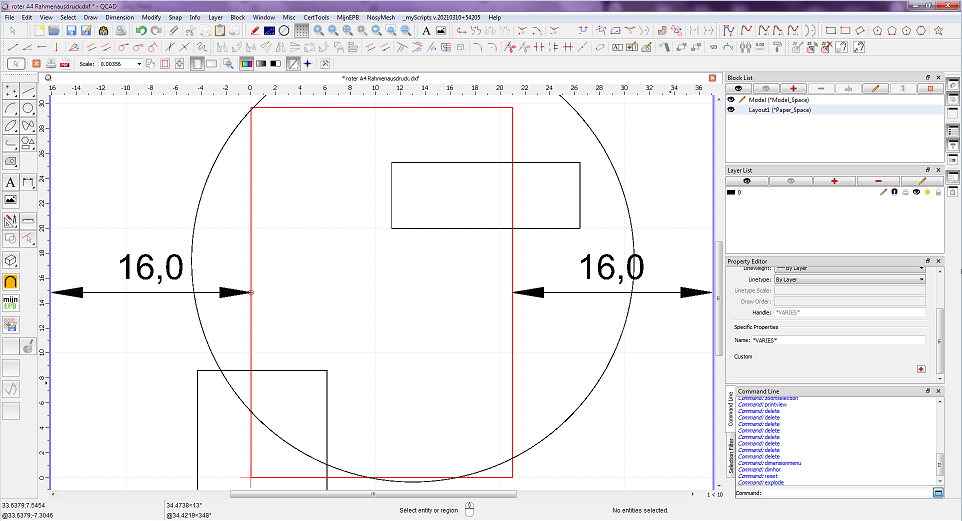
- Fenster drucken 2.png (136.73 KiB) Viewed 82424 times
Die Druckerausgabe umfasst jetzt viel mehr als nur die Fläche Ihres roten Rechtecks.
In meinem Fall würde eine Seite eine Fläche von etwa 59 mal 83 Metern darstellen, also etwa das Achtfache der vorgesehenen Fläche.
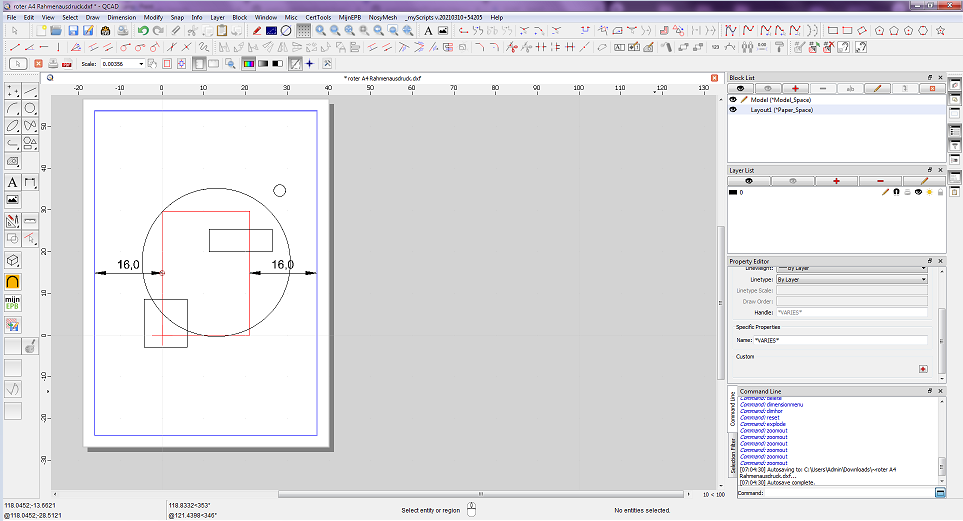
- Fenster drucken 3.png (126.98 KiB) Viewed 82424 times
Bei CAD dreht sich alles um Präzision ... „
GUMP“ oder besser gesagt
GIMP ist eine Bitmap-Manipulationsanwendung.
Dann ist es einfacher, die Schaltfläche „Bildschirm drucken“ auf Ihrer Tastatur zu verwenden.
Dadurch wird der Bildschirm „wie er ist“ als Pixel in die Zwischenablage kopiert, einschließlich der QCAD-GUI und allem, was sichtbar ist.
Dieses Bild kann in jede Bitmap-Anwendung eingefügt werden.
Sie können aus QCAD auch nur die Ansicht direkt als Bitmap oder im SVG-Format exportieren.
Wenn nur der Inhalt innerhalb des roten Rechtecks gedruckt werden soll, sollten Sie das Hinzufügen von Ansichtsfenstern zu einem Seitenlayout in Betracht ziehen. Dadurch wird auch der Inhalt beschnitten.
https://www.ribbonsoft.com/de/tutorial- ... -viewports
Siehe Block „Layout 1“ in der beigefügten Datei.
Da Sie wissen, dass Ihr rotes Rechteck in der unteren linken Ecke der Ursprung ist und
es sich um ein übergroßes A4-Format handelt, können Sie die Seite auch manuell einrichten:
Zeichnungseinstellungen .. Drucken .. Seite .. Anseichbereich:
- Skalierung: 1:100 (0.01)
- Verschiebung X/Y = Nullpunkt
Grüße,
CVH
Google übersetzt von:
It would be interesting to see what the expected output on paper needs to be.
What “Print Screen” has to do for you or why it would be more suitable...
Your red rectangle is 21 by 29,7 meter, it is in Portrait style.
Your Model_Space view on screen looks most probably more like Landscape ...
... Unless your monitor is positioned in a vertically manner of course (mine is not).
If you select the red rectangle and 'Zoom to Selection' (ZS) then QCAD will zoom automatically leaving a certain margin at the top and the bottom.
See: App.Prefs. .. Graphics View .. Appearance .. Auto Zoom .. Margin (px) (Default is 25 pixels)
Left and right there will be a lot more room to spare.
>> Image 1 <<
Your paper is configured as ISO A4 in Portrait.
If I then use 'Print Current View' (Ctrl+Alt+P) then QCAD will figure out a scale (e.g. 0.00356) and
a lower left corner (e.g. -18,9118; -26,7466) so that the width of the Model_Space view fits on the width of a page
accounting for paper margins (Light blue) and that the view is centered.
>> Image 2 <<
The printer output will now include a lot more then only the area of your red rectangle.
In my case a page would represent an area of about 59 by 83 meter or about 8 times the intended area.
>> Image 3 <<
All in CAD is about precision ... 'GUMP' or rather GIMP is a bitmap manipulation application.
Then it is easier to use the 'Print Screen' button on your keyboard.
That will copy the screen 'As is' as pixels to the Clipboard, including the QCAD GUI and whatever is visible.
This image can be pasted in any bitmap application.
You can also export only the view directly to bitmap or in SVG format from within QCAD.
If it is the intention of printing only the content within the red rectangle then investigate adding Viewports to a page Layout.
That will also crop the content.
>> Example <<
Knowing that the bottom left corner of your red rectangle the origin is and it is an over-sized A4,
then you can also set up the page manually:
Drawing Settings .. Printing .. Page .. Viewport:
- Scaling: 1:100 (0.01)
- Offset X/Y = Zero-Point
Regards,
CVH